
Yoga for lower back pain that actually helps
I’m a 6-foot-6 yogi, and as strong as my core is from Boat Pose, as many Chaturangas as I do, and even as often as I strength train, I’m liable to throw out my back at any given moment.
The other day, it happened at the end of a class I was teaching at CorePower, during a Butterfly Pose, when I brought everyone down from the height of the class and to a moment of restoration. While I told them, “All that push, all that effort is behind you,” I gently folded forward in the position with my heels a little too close to my inner groin, and I tweaked something in my lower back that has taken over the last week of my life and made teaching—and functioning—very difficult.
As with any other injury, you realize how important the injured area is to anything that you do. Even though Butterfly is a pose recommended to help ease lower back pain, I found myself blaming it for the most recent upset in my body. Fortunately, it’s not the only pose out there to help aid pain in your lower back (though, ironically, it also has aided in the healing process). Sometimes, just trying a couple of poses at a time or doing a few exercise drills can help you work through the discomfort.
What Causes Lower Back Pain?

Before we get into the nitty-gritty of what poses are best for your lower back pain, it’s important to understand some common causes of lower back pain in the first place. To be clear, I’m not a doctor, just a yoga teacher, so everything listed here is about generalized knowledge. If it doesn’t apply to you, either take what resonates and leave the rest, or consult with your doctor for any deeper issues you may think you have.
Lower back pain is rarely just “one thing.” It’s usually a combination of habits, mechanics, strength imbalances, and sometimes plain bad luck. Let’s take a look at some of the most common complaints behind lower back issues.
Overuse and Repetitive Strain
If you’re active—whether that’s yoga, strength training, running, or even teaching multiple classes a week—your lower back can become a compensation zone. When your glutes are underactive, or your core isn’t firing efficiently, your lumbar spine often takes over. Over time, that constant, low-level strain adds up.
Even something as simple as repeatedly hinging forward with a slightly rounded posture can irritate the muscles and connective tissue around the spine.
Posture (Especially Sitting)
Modern life doesn’t help.
Hours spent sitting, whether at a desk, in a car, or on the couch, shorten your hip flexors and tighten the front of your body. When your hip flexors tighten, they can pull your pelvis into an anterior tilt, which increases the compression in your lower back.
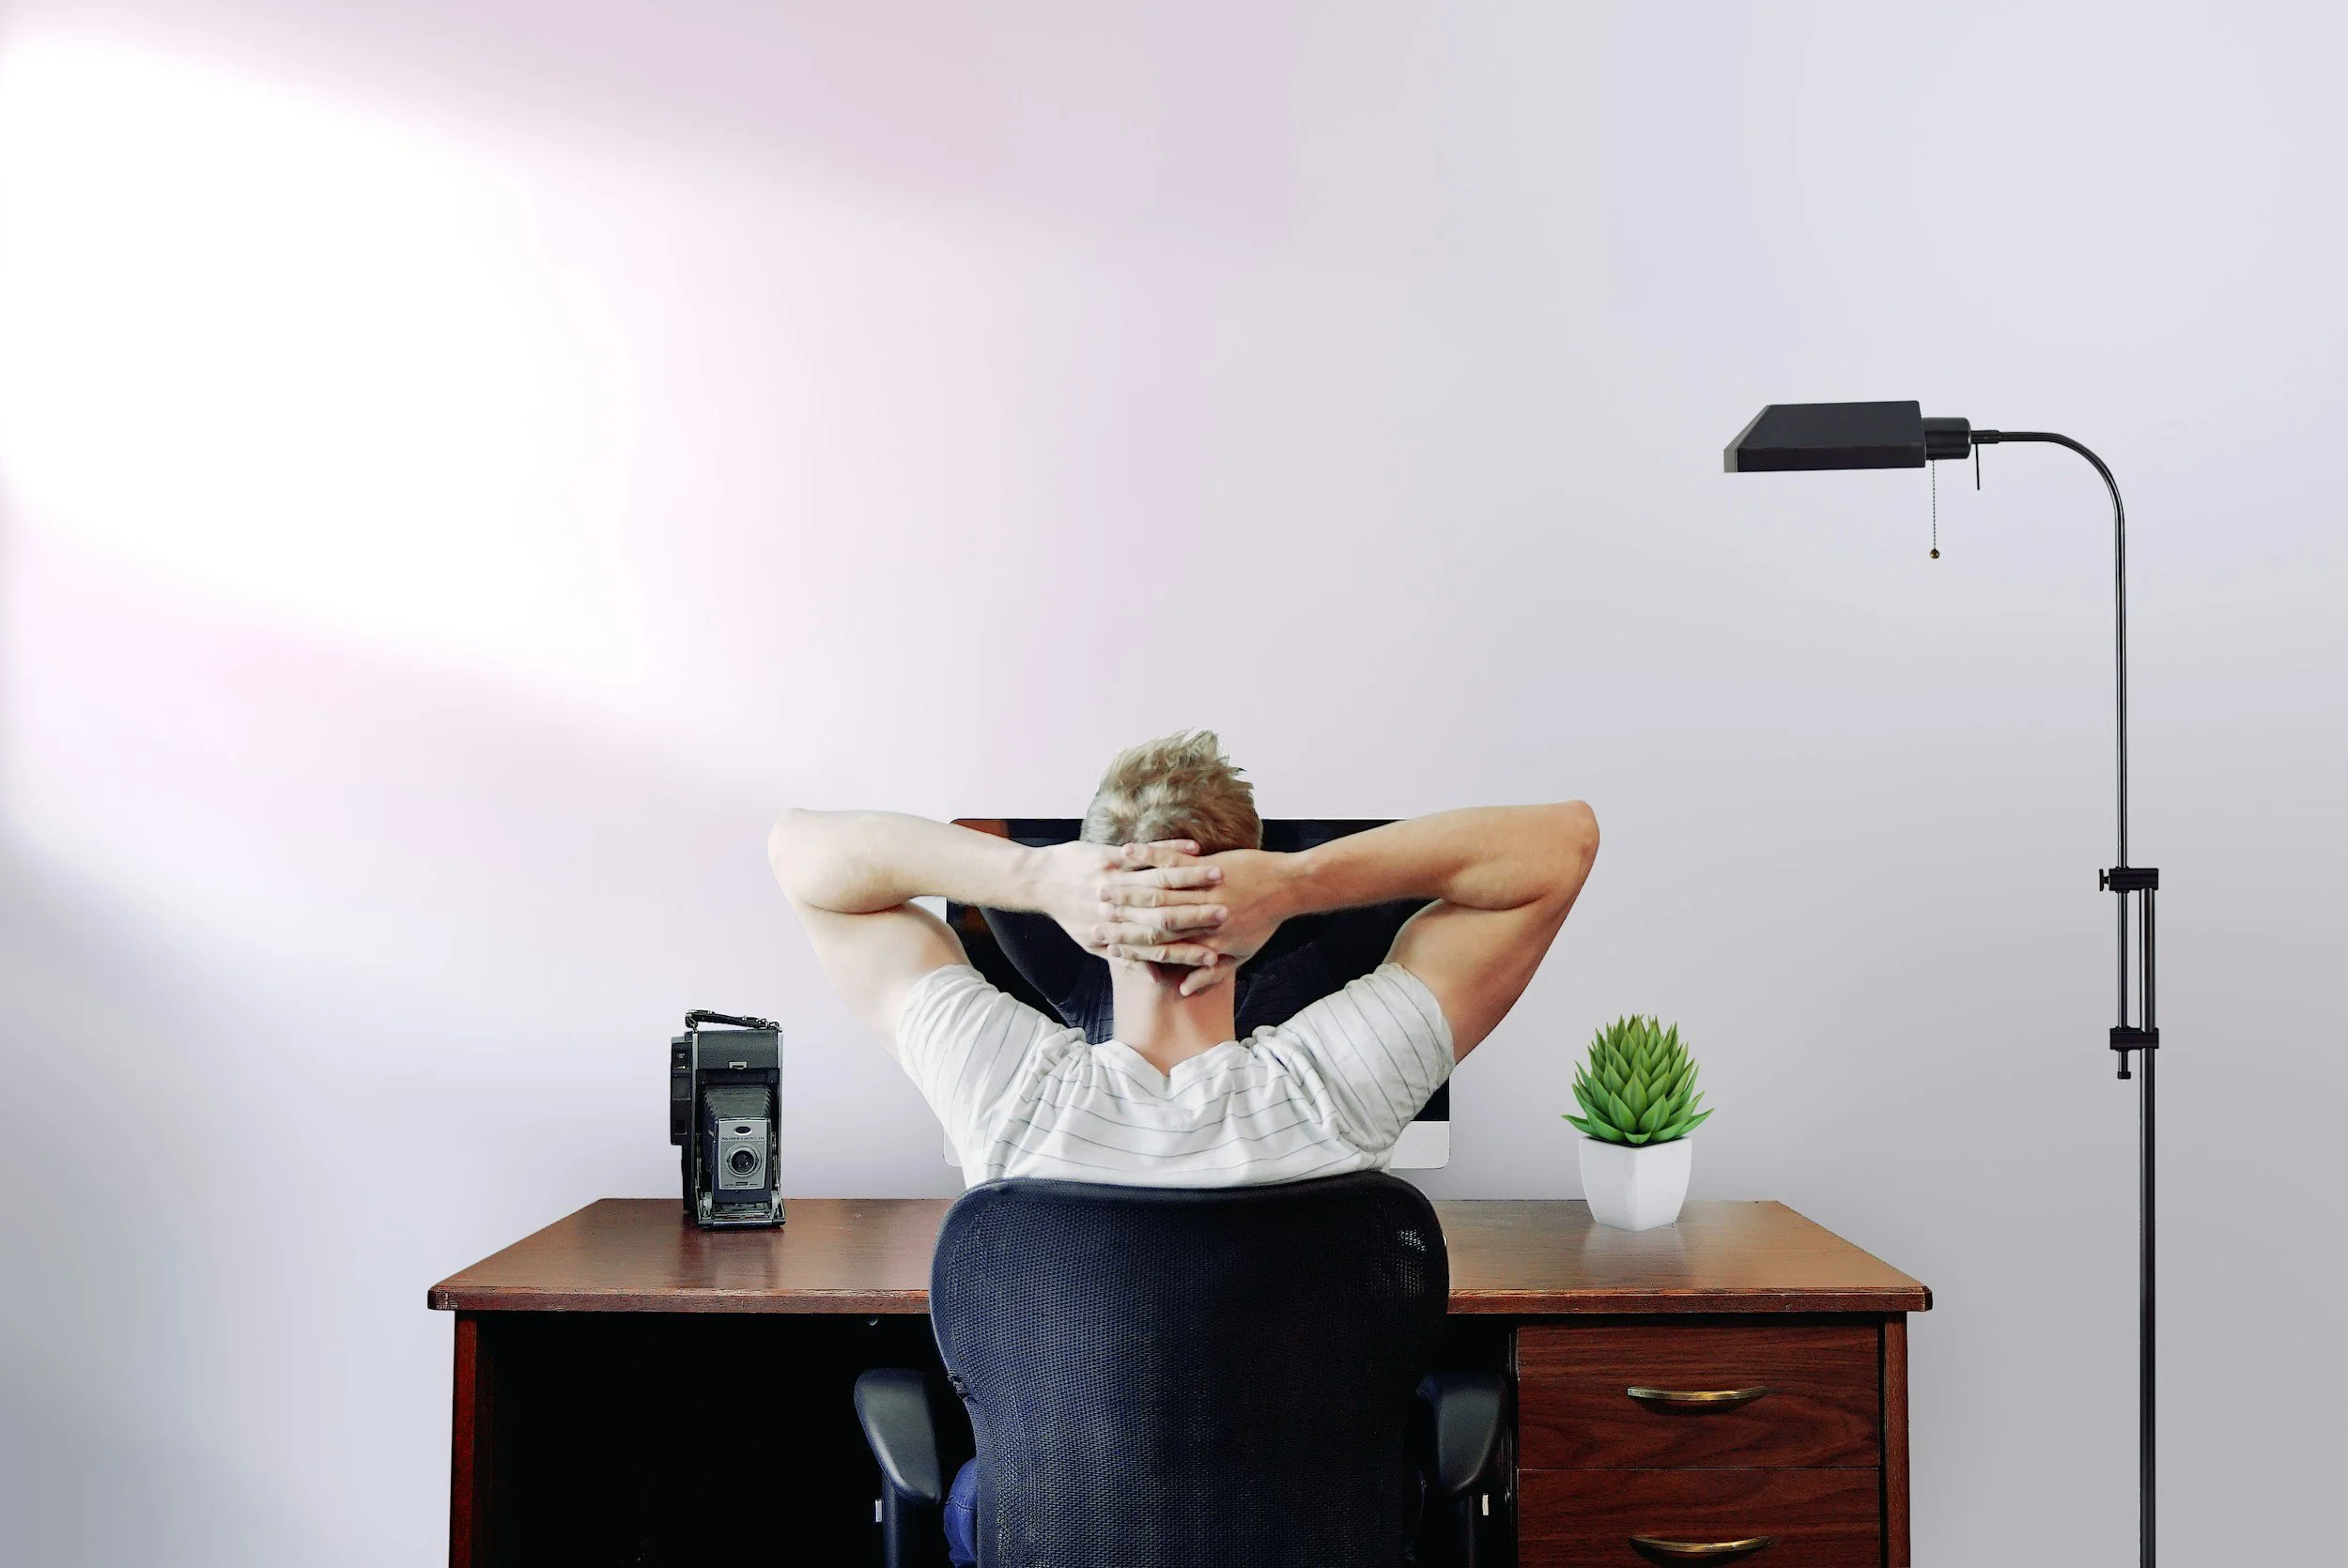
On the flip side, prolonged slouching creates excessive spinal flexion, which can strain ligaments and discs over time (something I’m also guilty of and currently doing as I write this post).
Needless to say, when you slouch, your lumbar spine ends up working harder than it should.
For taller bodies, this can be amplified. Chairs, desks, and even kitchen counters often aren’t designed with long femurs and longer torsos in mind. So we adapt. And sometimes that adaptation shows up as discomfort.
Lifting Mechanics
Improper lifting is one of the most common triggers for acute lower back pain.
Whether it’s deadlifting with poor form, rounding into a grocery bag pickup, or twisting while bending, the lower back doesn’t love sudden load under rotation. Often, the injury itself isn’t dramatic; it’s just the moment where your system says, “That was enough.”
Tight Hips and Limited Mobility
This one is big.
If your hips don’t move well, your lower back will.
When internal or external hip rotation is limited, when hamstrings are tight, or when glute strength is lacking, the lumbar spine ends up taking on movement that should belong to the hips. Over time, that compensation pattern can create irritation or instability.
That’s one reason poses like Butterfly, Pigeon, and lunges are often recommended: they target your hips, so your lower back doesn’t have to do all the work.
When It’s More Than Muscle Tightness
Most lower back pain is muscular or mechanical in nature, but sometimes it involves deeper structures.
Again, be sure to get yourself properly checked if you suspect you have any of the following. Nothing here should replace medical evaluation, especially if you’re worried about something. This is just for your general knowledge.
Sciatica
Sciatica refers to irritation of the sciatic nerve, which can cause radiating pain down one leg. It’s often associated with disc issues or tight muscles (like the piriformis) pressing on the nerve.
If you’re experiencing tingling, numbness, or pain traveling below the knee, that’s a sign to slow down and consult a medical professional.
Herniated or Bulging Discs
Between each vertebra is a disc that acts like a cushion. When those discs bulge or herniate, they can press on nearby nerves and cause pain.
Flexion-heavy movement (lots of rounding forward) can sometimes aggravate disc issues, which brings us to something else you should keep in your arsenal while you’re exploring your body: The difference between flexion and extension, especially when it comes to your spine.
A Quick Lesson on Flexion vs. Extension
The spine moves in several directions, but the two most relevant here are flexion and extension.
Flexion is rounding forward. Think Forward Fold or bringing your chest toward your thighs.
Extension is arching or backbending. Think Cobra or Upward-Facing Dog.
Many people instinctively move into flexion when their lower back hurts. It feels relieving at first because it stretches the muscles along the spine. But if the issue is disc-related, excessive flexion can sometimes worsen symptoms (and again, I’m personally guilty of this).
That’s where gentle extension comes in.
Backbends, when done mindfully, can help restore balance to the spine by encouraging space in your front body and strengthening the muscles that support upright posture. Even subtle extensions, like Sphinx or low Cobra, can sometimes provide more lasting relief than another forward fold.
The key is not “more stretching.” The key is balanced movement.
Strength Matters More Than We Think
Flexibility alone doesn’t protect your lower back.
Core strength, glute activation, and proper hip mechanics are what help stabilize the lumbar spine. Boats, planks, bridges, and controlled backbends often play just as important a role in reducing pain as gentle stretches do.
That’s why the exercises we’ll move into aren’t just about folding forward, but about restoring balance between mobility and stability. They’re split between poses and exercises to strengthen your lower back, and a more yin-style section to help stretch and soften.
As always, modify when needed, and be mindful that some of these exercises may be more difficult than others, depending on how recently you hurt yourself and the level of your pain. Lower back pain often improves not just from stretching what’s tight, but from strengthening what’s weak. Move slowly, prioritize control over range, and stop if pain sharpens or radiates.
For Strength
Locust/Locust Lifts
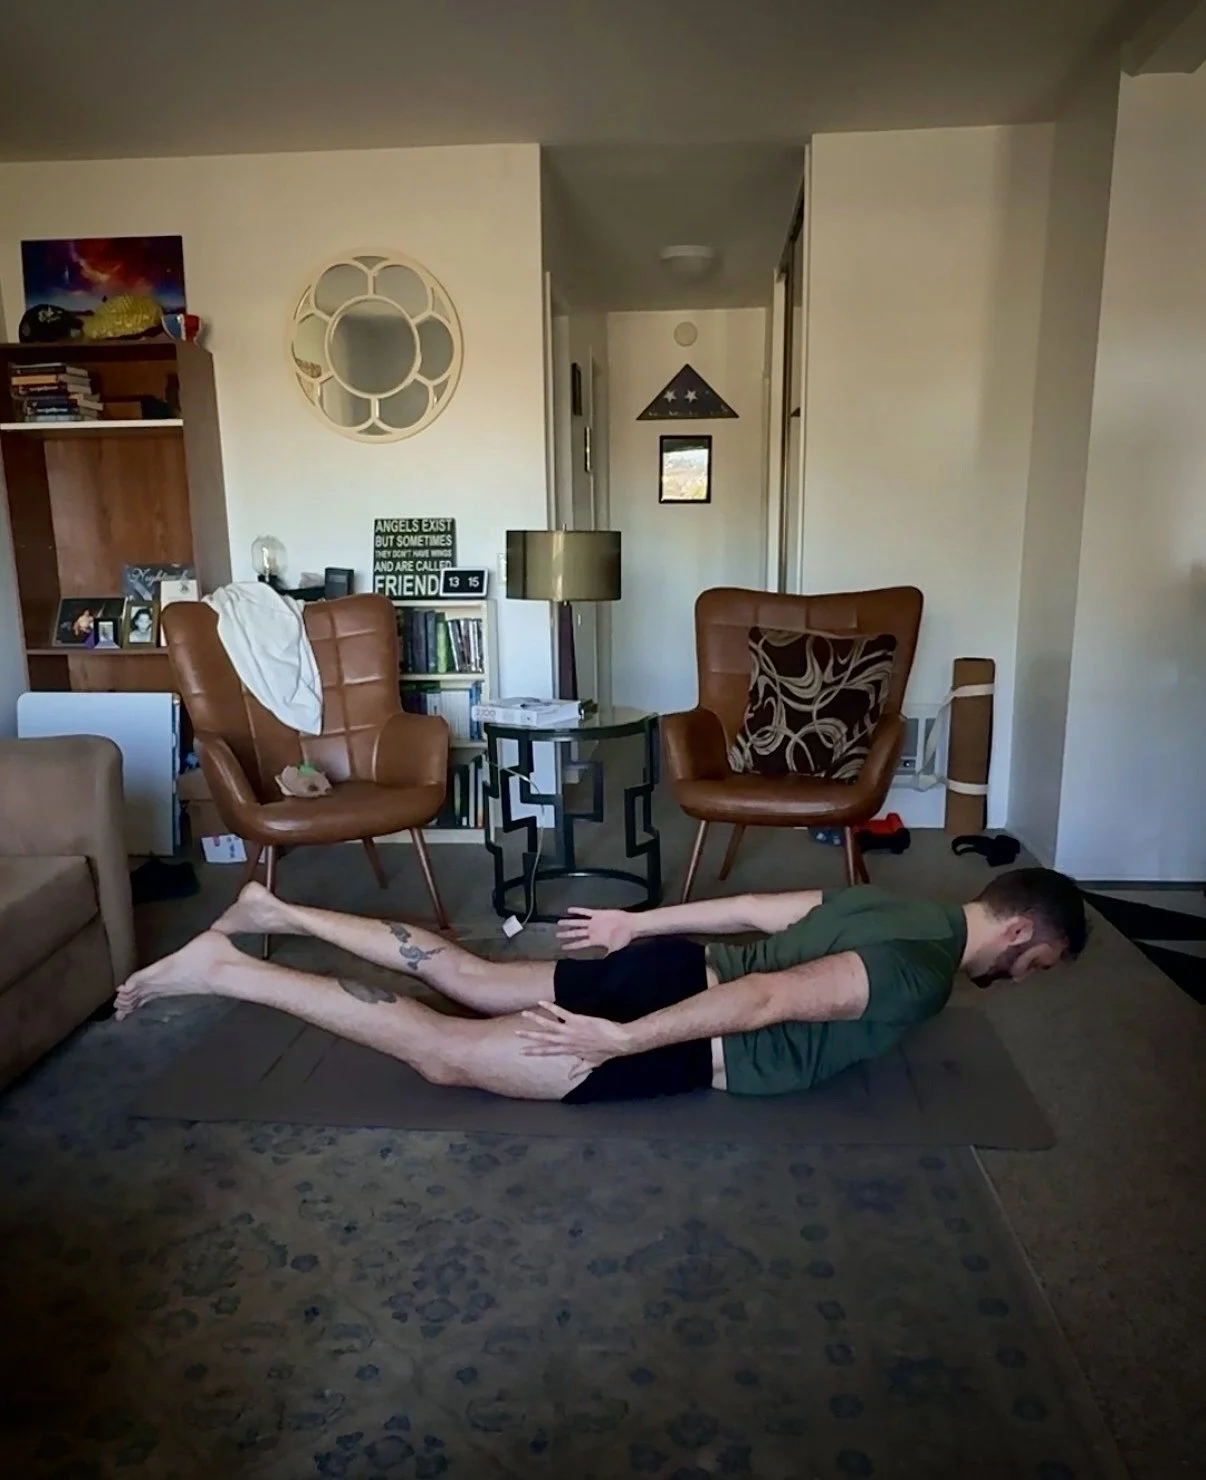
Lie on your belly (prone position) with your arms alongside your body or reaching back toward your heels.
On an inhale, gently lift your chest and legs off the floor. Keep the back of your neck long and your gaze slightly forward or down. Think of lengthening rather than crunching upward.
For added control, try lifting one leg at a time before lifting both. Also, feel free to keep your legs on the ground and focus only on the lift in your shoulders and chest.
After a few repetitions of lifting and lowering, hold the Locust Pose at the top. This pose strengthens the posterior chain of your glutes, hamstrings, and spinal stabilizers, which help support the lumbar spine during everyday movement.
Hold for 3–5 breaths, or perform 5–8 controlled lifts.
Cobra/Upward Dog
From prone, place your hands under your shoulders.
Press into your palms and gently lift your chest. In Cobra, keep your hips grounded and your knees down. In Upward Dog, press through your hands and the tops of your feet to lift your thighs, as well.
Draw your shoulders down and engage your lower belly slightly to avoid dumping into your lower back. Pull your chin back toward your neck and squeeze your shoulder blades together to open up more in the front of your chest. Backbends are also heart-openers, which are great to help you find the full movement of your spine. They strengthen the muscles that support spinal extension and counteract excessive rounding from sitting and forward folding.
Hold for 3–5 breaths, or repeat 5 controlled reps.
Bird Dog/Crunches
From Table Top, extend your right arm forward, thumb up, and your left leg back, toes flexed down. Find spinal extension first; focus on creating as much space as possible from your right middle finger to your left big toe. Pull your right arm forward as you kick your left leg back, and squeeze your left glute to help keep your leg lifted.
If spinal balance is enough for you, stay here. If you want to build more strength in your core and lower back, exhale and crunch your right elbow and left knee together at your center, then inhale to lengthen them back out. Take your time here. It isn’t about speed, but rather control as you move. Stretch your right shoulder blade and your left hip as you breathe in, then strengthen your core and lower back as you breathe out to meet it all at the center.
Shift from mobility to stability in either your crunch or your bird dog hold. Keep your hips level. Move with control. Your lower back should feel supported, not strained.
Aim for 8 slow reps on each side. Add or subtract as needed.
Piriformis Push-ups
Sit in a 90/90 position with your right leg bent in front of you at 90 degrees and your left bent behind you at 90 degrees. Keep your feet flexed to protect your knee joint.
Align your chest over your front shin. As you inhale, hinge forward over your right leg, and keep your spine long. Feel free to use your fingertips at first to help you find balance.
Exhale and press through the outer hip of your front leg to lift your torso back to center. Try to use your glute and deep hip muscles rather than pushing off the floor with your hands.
Move slowly and with control. This is not a stretch you collapse into, but rather to build strength in your piriformis muscle, which is a pear-shaped muscle deep inside your outer glute that’s essential to the rotation of your hip and the lift of your legs. These controlled reps strengthen the piriformis and deep external rotators, which help stabilize the pelvis. When your hips are strong and mobile, your lower back doesn’t have to compensate.
Shoot for 5 slow reps per side. If this feels shaky, that’s the point. Weak or underused hip stabilizers are often part of the lower back pain equation.
Dead Bugs
Lie on your back (supine position) with your knees bent at 90 degrees and arms reaching toward the ceiling.
Engage your core gently by drawing your ribs toward your hips. Inhale and slowly extend one arm and the opposite leg toward the floor without letting your lower back arch. Exhale to return to the center with control, then switch sides.
This is the same movement as Bird Dog Crunches, but performed on your back. Keep your lower back and your shoulders pressed against the mat/floor underneath you, and let your deep core, shoulder joints, and hip flexors do all the work. Dead Bugs train deep core stability while teaching you to move your limbs without sacrificing spinal alignment.
Take 8–10 slow reps per side, and add on (or subtract) as you need.
For Stretch
Breathwork: Boxed Breathing, breathe into the lower back
Lie on your back with your knees bent and feet on the floor. Place one hand on your belly and one hand on your lower ribs.
Inhale for 4. Hold for 4. Exhale for 4. Hold for 4.
As you breathe, imagine expanding into the back of your ribcage and lower back. This helps release unconscious tension and gently decompress the lumbar spine before movement begins.
Stay here for 1–2 minutes, or as long as you desire. You can also play with the count of your breath. I suggest starting with a 4-count, add one second per round until you reach an 8-count, then subtract a second per round until you come back down to a 4. The important thing here is to visualize your breath expanding, opening, and even healing in your lower back to help you release your pain.
Melting Heart/Puppy
Come to a Table Top. Keep your hips stacked over your knees, then walk your hands forward as you bring your chest and your forehead down toward the ground. It’s okay if your chest doesn’t reach! In vinyasa-style classes, this pose is known as Puppy, and in yin, it takes the form of Melting Heart. Envision your heart melting closer to the Earth beneath you as you breathe.
This is also a gentle backbend, but be mindful not to collapse into your lower back. Keep a slight engagement in your core and think about the length you’re creating through your side body. Let your chest melt without dumping into your lumbar spine.
This opens your thoracic spine and shoulders, reducing how much your lower back compensates.
Hold for a minimum of 5–8 breaths, or longer as desired.
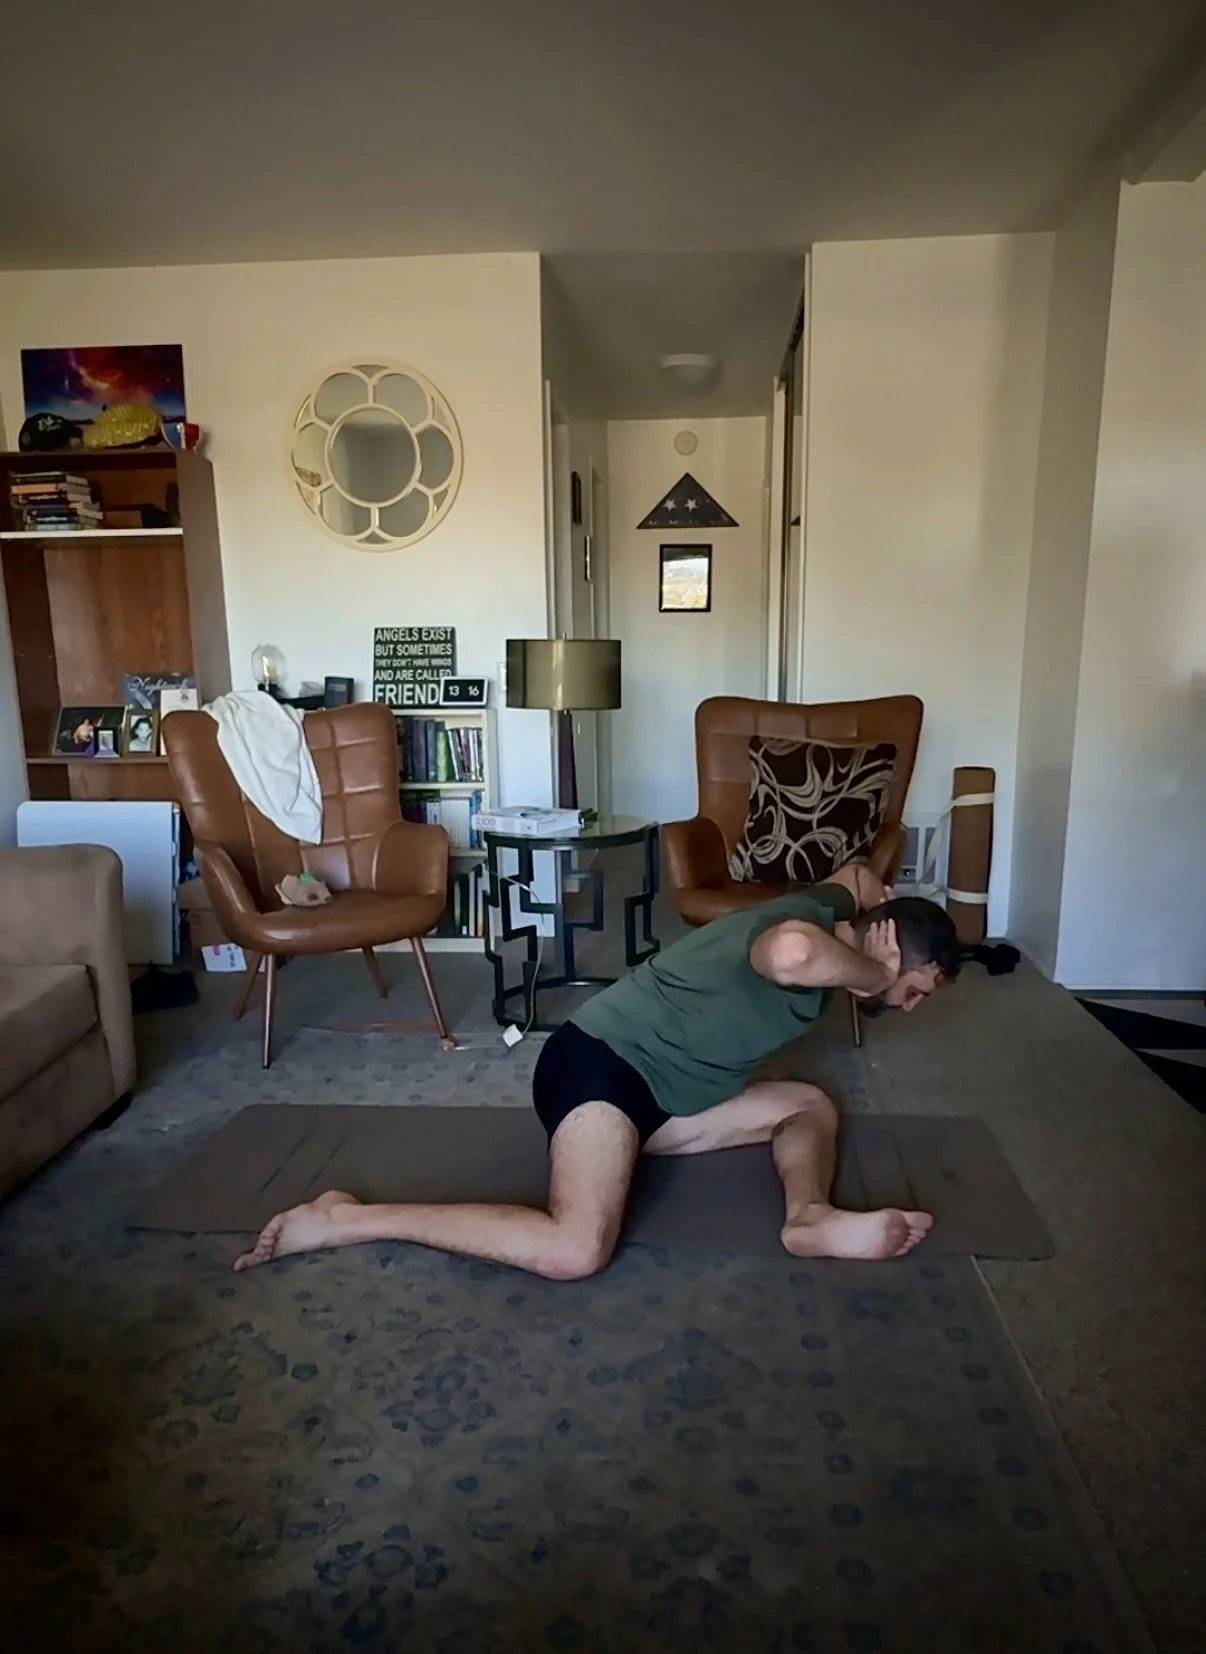
Thread the Needle (Child’s Pose variation)
From Table Top or Child’s Pose, slide your left arm underneath your right and find a gentle rotation in your upper body. The Child’s Pose variation, with your hips relaxed down on top of your heels, focuses more on the compression in your belly and releases some of the pressure on your lower back that you may experience from Table Top. Feel free to choose the variation that suits you best.
Focus on the gentle stretch of your left shoulder, and twist through your mid-back so you don’t make the pain in your lower back any worse. This position restores rotational mobility that often gets lost from sitting. Those who sit a lot are also likely to have tight hips (which means those piriformis push-ups probably sucked pretty bad), and tighter hips contribute to lower back strain from overcompensation.
Hold for a minimum of 5–8 breaths on each side.
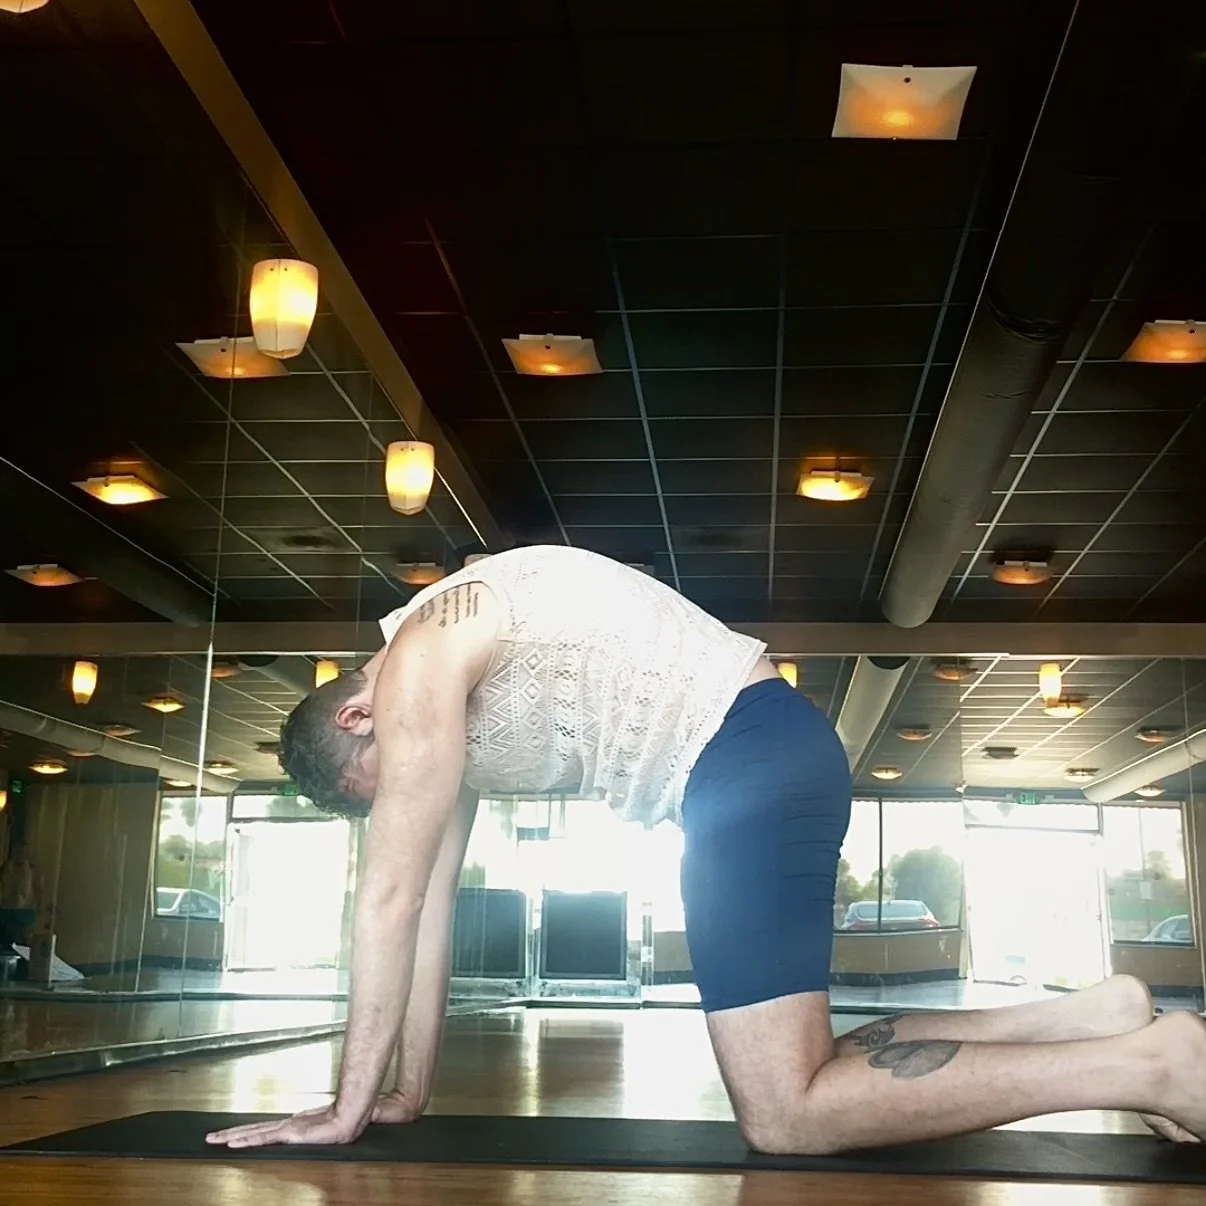
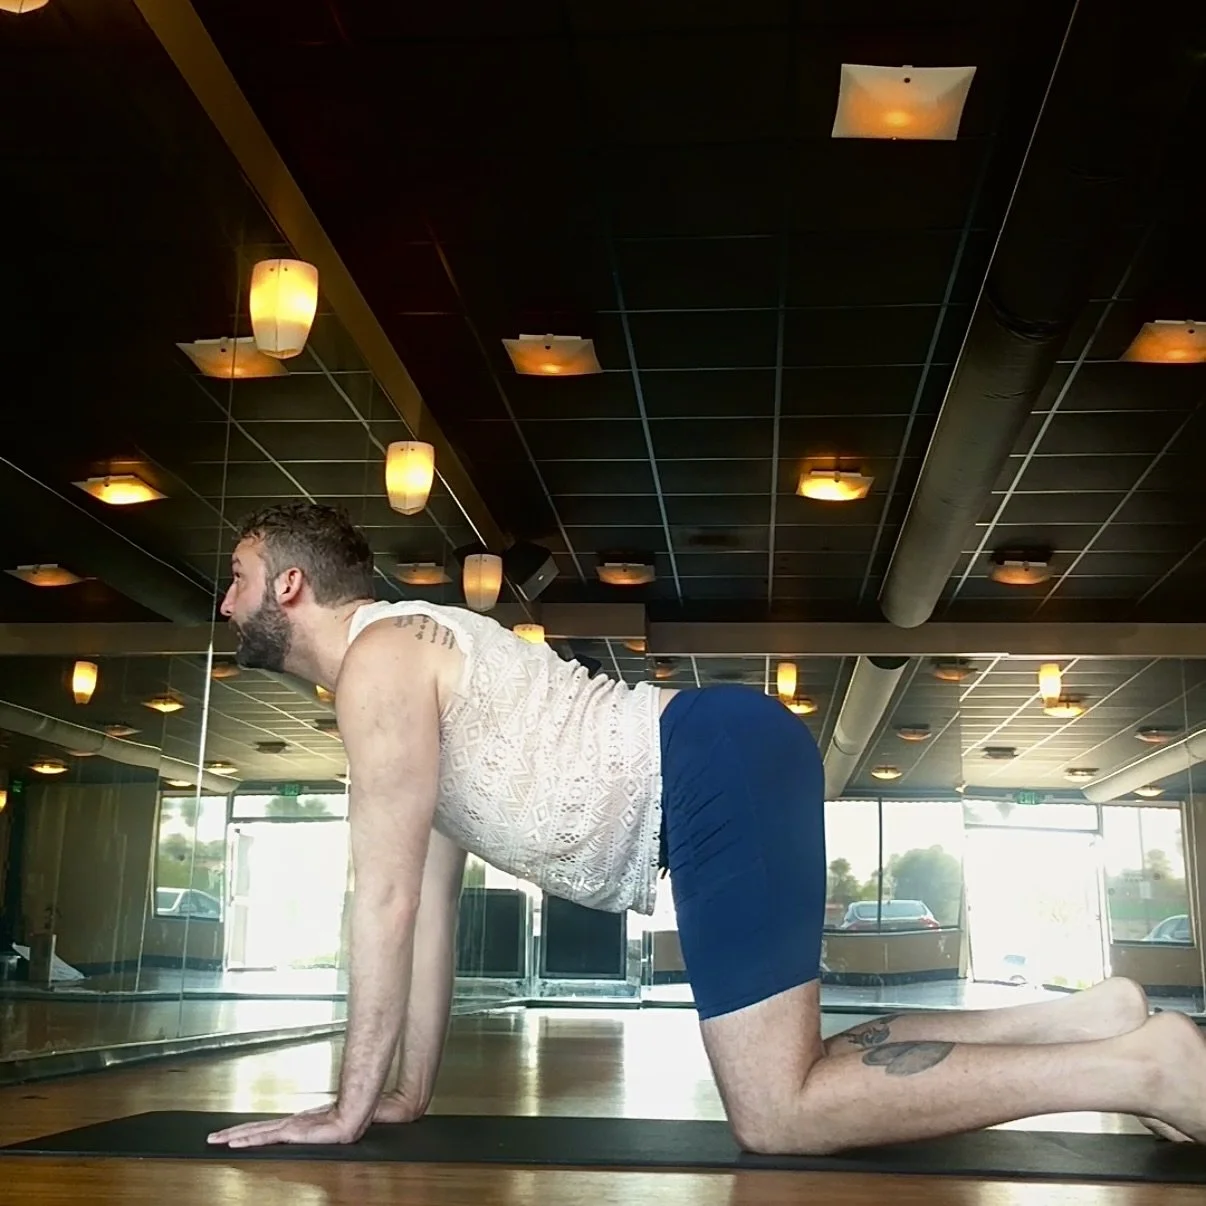
Cat/Cow
Return to a Table Top position and take some Cat/Cow to move slowly between flexion and extension. Instead of connecting breath-to-movement as is common in Cat/Cow, take some time to explore each pose.
Inhale Cow, drop your belly, lift your chin, and pause. Gently squeeze your shoulder blades together and broaden more through your chest. Gently tilt your pelvis to explore extension through the lumbar spine. Take 2-3 breaths here.
After some time in Cow, exhale for Cat. Round your shoulders, push the ground away, tuck your chin to your chest, and tuck your tailbone under to breathe into the flexion of your lower back. Stay here for a few breaths, as well.
Alternate between these poses, but keep the movement controlled and smaller than you think it needs to be. The goal is lubrication, not intensity. It’s also a moment to connect with a couple of postures that are usually done rapidly and without focus in class.
Repeat for 6–8 rounds.
Sphinx
Lower onto your belly and prop up onto your forearms. Bring your feet wider apart to ease tension in your lower back. As with all backbends, keep a squeeze in your butt cheeks to protect your lower back, too.
Ground your pelvis down as you lift through your chest. Press into your palms, forearms, and tops of your feet as you find your position. Engage your lower belly to prevent compression.
This gentle extension can help counteract excessive rounding and may relieve disc-related discomfort when done mindfully.
To increase the stretch and strength in your lower back, straighten your arms for a Seal Pose. Find maximum Seal by bending your knees and drawing your heels toward your glutes.
To decrease pressure in your lower back, rest your chin on your hands or a block. You can also rest your forehead on a block, or place a bolster between your elbows and your chest for additional comfort and support.
Hold for 5–10 breaths, or aim to be here for a few minutes.
Half Frog/Quad stretch
From prone, bend your right knee and reach back for your foot. Use a strap if you struggle to make a connection. Keep your hips square to the ground and squeeze your right glute as you pull your heel closer to stretch your right quadricep.
Tight quads and hip flexors can pull the pelvis forward and increase lower back compression. Releasing them helps restore balance.
If this doesn’t feel good for you, even with a strap, you can also bring your right knee off to the right side of your mat into a 90-degree position. Keep a flex in your right foot if you choose to do so. This variation still targets your outer hip flexors, but stretches your inner thigh rather than your quads.
Hold for a minimum of 5–8 breaths per side.
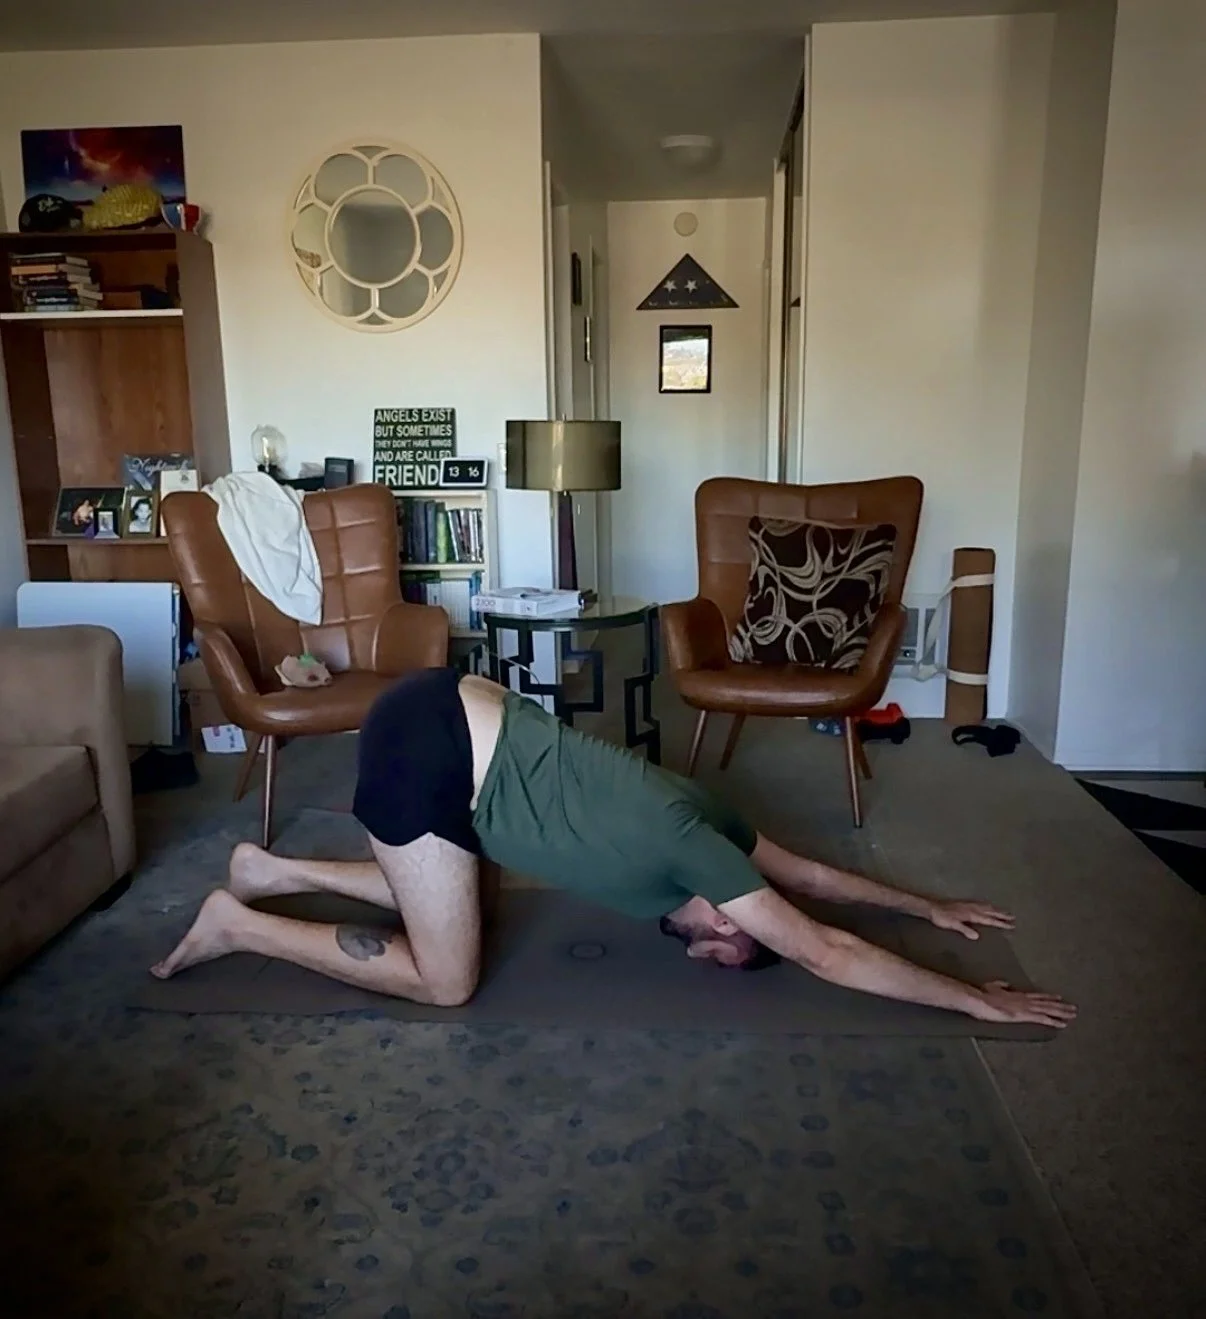
Butterfly

Yes, it’s the most recent culprit in my own tinge of my back, but it’s still been a great pose to return to as I breathe into it and come back to where I was before.
Sit upright with the soles of the feet together and your knees out wide. Place blocks under either or both knees if you need to. You can sit upright and tall, or you can fold forward. If you fold, focus on the hinge coming from your hips rather than your back. In addition to blocks under your knees, you can also sit upright on a block or bolster.
This opens your inner thighs and hips without forcing lumbar flexion. The closer your heels are to your groin, the more you’ll target your inner thighs. The further your feet are away from you, the more you’ll feel it in your outer hips.
Stay for at least 5–10 breaths wherever you land.
Supported Bridge/Spinal Release
Lie on your back and lift your hips just enough to slide a block or bolster underneath your sacrum (the biggest, flat bone at the base of your spine above your tailbone). Use the prop to let your hips be heavier and rest your shoulders.
You can stay passive, or press lightly into your feet for a bit of glute activation before settling down. This creates gentle extension while also allowing your lower back to relax. You can also extend your legs to deepen the stretch in your hips and lower back.
Hold for 1–2 minutes.
Be mindful when you release, and if you’re super fresh into the pain, perhaps skip the next step. If you’re able to keep your hips lifted for a few breaths without support, then work toward a spinal release.
From Bridge (now unsupported), tuck your chin to your chest and start to lower, with control, one vertebra at a time from the top of your neck all the way down to your lower back. Take as much time as you can when you get there, and be extra mindful once your shoulders are down and your lower back, core, and glutes must take all the strain as you continue lowering your hips.
Do this 2-5 times, or as many as you can that feel good.
Legs Up the Wall
In Legs Up the Wall, you have the option to either position yourself next to a wall and send your legs up it while you rest on your back, or you can do this from your mat. For back pain, especially, I prefer the latter. On your mat, place either a block underneath your lower back again or rest your hands on the ground underneath your hips, then send your legs to the sky.
Keep any amount of bend in your knees as needed, whether your legs are against an actual wall or floating. If you’re on the mat, keep a gentle engagement in your lower abdomen to take off the pressure in your lower back.
Overall, this position reduces pressure on your lumbar spine and allows your nervous system to downshift. It’s another great place to practice some Boxed Breathing.
Stay for 2–5 minutes.
Savasana
Never cheat yourself of an opportunity to take Savasana. It’s a pose many people skip, and it’s often because they have a hard time simply lying in a corpse position for a few minutes, because their mind starts to wander.
Whether you’re in yin, vinyasa, ashtanga, or anything in between, take time to do your Savasana. When it comes to relieving pain in your lower back, it’s equally important to take it.
If you need some additional support, place a bolster, block, or rolled blanket under your knees. You can also place something underneath your head for an extra pillow.
Let your body settle. Lower back relief often comes not just from movement, but from allowing the nervous system to feel safe again.
Stay for at least 3–5 minutes, but be sure it’s always the longest pose you hold in any practice.